> ## Documentation Index
> Fetch the complete documentation index at: https://artie.com/docs/llms.txt
> Use this file to discover all available pages before exploring further.
# Tables
> Learn how to replicate, configure, and manage tables in Artie.
## Replicating tables
Once you create a pipeline, you select which tables to replicate from your source database. Artie handles the rest - performing an initial snapshot (backfill) of existing data, then continuously streaming changes via CDC to keep your destination in sync.
To manage which tables are replicated, navigate to your pipeline and click `Edit` > `Tables`.
 ## History mode
[History mode](https://www.artie.com/blogs/history-table) provides a complete audit trail of all changes to your data. When enabled, Artie creates a separate table named `{TABLE}__HISTORY` that records every insert, update, and delete made to the original table.
The history table includes these additional columns:
| Column | Description |
| ----------------------- | ---------------------------------------------------- |
| `__artie_operation` | The type of change (`CREATE`, `UPDATE`, or `DELETE`) |
| `__artie_updated_at` | When Artie processed the change |
| `__artie_db_updated_at` | When the change occurred in your source database |
* Tracking data changes over time
* Auditing and compliance
* Data recovery and point-in-time analysis
1. Edit your pipeline
2. Go into the `Tables` tab
3. Find the table you want to enable history mode for and toggle the switch to enabled
4. To enable history mode for multiple tables at once, select them using the checkboxes on the left side of the list
## Schema evolution
Artie supports schema evolution out of the box - automatically creating destination tables, detecting and adding new columns, and optionally dropping deleted columns after a safety verification period.
For a full explanation of how schema evolution works, including column exclusion/inclusion and hard deletes for columns, see the [Schema evolution guide](/guides/artie/schema-evolution).
## Destination table naming
When syncing tables from a source that supports multiple schemas into a single destination schema, Artie automatically prefixes the destination table name with the source schema name, but only when the source schema is not the default schema for that connector.
| Source | Default schema (no prefix) | Non-default schema (prefixed) |
| ------------------------ | -------------------------- | ----------------------------- |
| PostgreSQL / CockroachDB | `public` | any other schema |
| SQL Server | `dbo` | any other schema |
For example, if you replicate both `dbo.actions` and `accounting.actions` from SQL Server into a single Snowflake schema, they arrive as:
* `dbo.actions` → **`actions`** (no prefix, `dbo` is the default schema)
* `accounting.actions` → **`accounting_actions`**
Tables with the same name in different source schemas will always land as distinct tables in the destination, without any configuration needed.
If you prefer to route each table into a matching destination schema rather than prefix the table name, enable **Use Same Schema As Source** in your pipeline’s destination settings.
With that option enabled, the same SQL Server example would produce:
* `dbo.actions` → destination schema `dbo`, table `actions`
* `accounting.actions` → destination schema `accounting`, table `actions`
This is supported on any destination that has schema-level namespacing: Snowflake, Redshift, SQL Server, and PostgreSQL.
## Table settings
To find table settings, click on your pipeline > `Edit` > `Tables` > `Table settings`.
### General
#### Use different name in destination
This setting allows you to define a new table alias. If your source table is named `foo`, you can name it `bar`.
## History mode
[History mode](https://www.artie.com/blogs/history-table) provides a complete audit trail of all changes to your data. When enabled, Artie creates a separate table named `{TABLE}__HISTORY` that records every insert, update, and delete made to the original table.
The history table includes these additional columns:
| Column | Description |
| ----------------------- | ---------------------------------------------------- |
| `__artie_operation` | The type of change (`CREATE`, `UPDATE`, or `DELETE`) |
| `__artie_updated_at` | When Artie processed the change |
| `__artie_db_updated_at` | When the change occurred in your source database |
* Tracking data changes over time
* Auditing and compliance
* Data recovery and point-in-time analysis
1. Edit your pipeline
2. Go into the `Tables` tab
3. Find the table you want to enable history mode for and toggle the switch to enabled
4. To enable history mode for multiple tables at once, select them using the checkboxes on the left side of the list
## Schema evolution
Artie supports schema evolution out of the box - automatically creating destination tables, detecting and adding new columns, and optionally dropping deleted columns after a safety verification period.
For a full explanation of how schema evolution works, including column exclusion/inclusion and hard deletes for columns, see the [Schema evolution guide](/guides/artie/schema-evolution).
## Destination table naming
When syncing tables from a source that supports multiple schemas into a single destination schema, Artie automatically prefixes the destination table name with the source schema name, but only when the source schema is not the default schema for that connector.
| Source | Default schema (no prefix) | Non-default schema (prefixed) |
| ------------------------ | -------------------------- | ----------------------------- |
| PostgreSQL / CockroachDB | `public` | any other schema |
| SQL Server | `dbo` | any other schema |
For example, if you replicate both `dbo.actions` and `accounting.actions` from SQL Server into a single Snowflake schema, they arrive as:
* `dbo.actions` → **`actions`** (no prefix, `dbo` is the default schema)
* `accounting.actions` → **`accounting_actions`**
Tables with the same name in different source schemas will always land as distinct tables in the destination, without any configuration needed.
If you prefer to route each table into a matching destination schema rather than prefix the table name, enable **Use Same Schema As Source** in your pipeline’s destination settings.
With that option enabled, the same SQL Server example would produce:
* `dbo.actions` → destination schema `dbo`, table `actions`
* `accounting.actions` → destination schema `accounting`, table `actions`
This is supported on any destination that has schema-level namespacing: Snowflake, Redshift, SQL Server, and PostgreSQL.
## Table settings
To find table settings, click on your pipeline > `Edit` > `Tables` > `Table settings`.
### General
#### Use different name in destination
This setting allows you to define a new table alias. If your source table is named `foo`, you can name it `bar`.
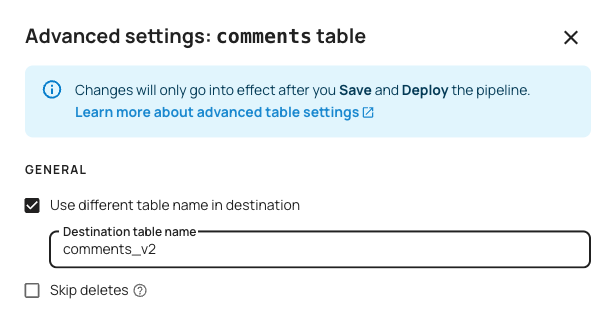 If your source type supports multiple schemas (e.g. PostgreSQL, SQL Server) and you're syncing all tables into one schema in the destination, tables that aren't in the source's default schema will still be prefixed with their source schema name in front of the alias you specify. This prevents accidental table name collisions in the destination.
For example, in a PostgreSQL → Snowflake pipeline, if you have source tables `public.foo` and `schema2.foo`, they would show up in Snowflake as `foo` and `schema2_foo` respectively. If you specify a destination table name of `bar` for the latter, it will be `schema2_bar` in Snowflake.
#### Skip deletes
When enabled, Artie will skip processing deletes. This setting is useful if you want to keep a smaller dataset in your source and have a complete archive in your destination.
For high volume tables, Artie also has an ability to specify a different set of flush rules. We will automatically do this for you based on your ingestion lag.
### Column configuration
#### Exclude certain columns
Replicate all columns except the ones you specify. This is useful for excluding sensitive data (e.g. PII, passwords), preventing unnecessary columns from being synced, or managing storage costs by skipping large or unused columns.
For more details, see our [Column inclusion and exclusion guide](/guides/artie/column-inclusion-exclusion).
#### Include certain columns
Replicate only the columns you explicitly list. This gives you complete control over your destination schema and helps maintain a clean, minimal dataset.
Column inclusion is mutually exclusive with column exclusion. When using inclusion, you'll need to manually add any new source columns to your inclusion list as they appear.
For more details, see our [Column inclusion and exclusion guide](/guides/artie/column-inclusion-exclusion).
#### Hash certain columns
Hashes the values of specified columns using SHA-256 before writing them to the destination. The hash is deterministic - the same input always produces the same output - so the data is irreversibly masked while preserving structure. Hashed values can still be used for joins, grouping, and deduplication across tables.
This is useful when you need to retain referential integrity across tables without exposing the underlying data (e.g. hashing email addresses or user IDs for analytics).
#### Encrypt certain columns
Encrypts the values of specified columns before writing them to the destination. Unlike hashing, encryption is reversible - you can decrypt the values later using the corresponding key.
Artie supports two key management options:
* **Auto-generated key** -- Artie generates and manages the encryption key for you.
* **KMS with Data Encryption Key (DEK)** -- Bring your own key by providing a KMS-managed DEK. This gives you full control over key rotation and access policies.
#### Compress certain columns
Applies transparent compression to specified columns. Artie compresses the column values in-flight, which allows large values to bypass Kafka's maximum message size limit. The values are decompressed before writing to the destination, so the data arrives unchanged - this does not affect the column's schema, data type, or stored values.
This is useful for large text or JSON columns that would otherwise exceed Kafka's message size threshold.
Column compression is mutually exclusive with [message compression](/pipelines/overview#message-compression). Only one can be active per pipeline.
If your source type supports multiple schemas (e.g. PostgreSQL, SQL Server) and you're syncing all tables into one schema in the destination, tables that aren't in the source's default schema will still be prefixed with their source schema name in front of the alias you specify. This prevents accidental table name collisions in the destination.
For example, in a PostgreSQL → Snowflake pipeline, if you have source tables `public.foo` and `schema2.foo`, they would show up in Snowflake as `foo` and `schema2_foo` respectively. If you specify a destination table name of `bar` for the latter, it will be `schema2_bar` in Snowflake.
#### Skip deletes
When enabled, Artie will skip processing deletes. This setting is useful if you want to keep a smaller dataset in your source and have a complete archive in your destination.
For high volume tables, Artie also has an ability to specify a different set of flush rules. We will automatically do this for you based on your ingestion lag.
### Column configuration
#### Exclude certain columns
Replicate all columns except the ones you specify. This is useful for excluding sensitive data (e.g. PII, passwords), preventing unnecessary columns from being synced, or managing storage costs by skipping large or unused columns.
For more details, see our [Column inclusion and exclusion guide](/guides/artie/column-inclusion-exclusion).
#### Include certain columns
Replicate only the columns you explicitly list. This gives you complete control over your destination schema and helps maintain a clean, minimal dataset.
Column inclusion is mutually exclusive with column exclusion. When using inclusion, you'll need to manually add any new source columns to your inclusion list as they appear.
For more details, see our [Column inclusion and exclusion guide](/guides/artie/column-inclusion-exclusion).
#### Hash certain columns
Hashes the values of specified columns using SHA-256 before writing them to the destination. The hash is deterministic - the same input always produces the same output - so the data is irreversibly masked while preserving structure. Hashed values can still be used for joins, grouping, and deduplication across tables.
This is useful when you need to retain referential integrity across tables without exposing the underlying data (e.g. hashing email addresses or user IDs for analytics).
#### Encrypt certain columns
Encrypts the values of specified columns before writing them to the destination. Unlike hashing, encryption is reversible - you can decrypt the values later using the corresponding key.
Artie supports two key management options:
* **Auto-generated key** -- Artie generates and manages the encryption key for you.
* **KMS with Data Encryption Key (DEK)** -- Bring your own key by providing a KMS-managed DEK. This gives you full control over key rotation and access policies.
#### Compress certain columns
Applies transparent compression to specified columns. Artie compresses the column values in-flight, which allows large values to bypass Kafka's maximum message size limit. The values are decompressed before writing to the destination, so the data arrives unchanged - this does not affect the column's schema, data type, or stored values.
This is useful for large text or JSON columns that would otherwise exceed Kafka's message size threshold.
Column compression is mutually exclusive with [message compression](/pipelines/overview#message-compression). Only one can be active per pipeline.
 ### Optimizations
#### Enable multi-step merge
For tables with very high write throughput on OLAP destinations (Snowflake, BigQuery, Databricks, Redshift), multi-step merge breaks the merge operation into smaller sequential steps rather than a single large statement. This enables Artie to handle extremely large flush batches (1 GB+) without hitting destination timeouts or resource limits.
See [Multi-step merge](https://www.artie.com/blogs/multi-step-merge) for a deeper look at how this works. For guidance on configuring flush rules alongside this setting, see [Tuning flush rules](/pipelines/flush-rules/tuning).
#### Use a merge predicate
Artie merges data into your destination based on your source table's primary key(s). If your destination table has an additional clustering or partitioning key, you can specify that column here so Artie includes it in merge predicates. This allows the destination to prune data during merges, reducing latency and cost.
If your Snowflake table has a cluster key, specify the clustered column. For example, if the table was clustered by `created_at`:
```sql theme={null}
ALTER TABLE foo CLUSTER BY (TO_DATE(created_at))
```
If your BigQuery table is partitioned, specify the partition column (e.g. `created_at`) so Artie can prune partitions during merges.
See [Enable BigQuery partitioning](/guides/database/bigquery/enable-bigquery-partitioning) for a step-by-step guide on setting up partitioned tables.
#### Parallelize backfill using CTID
For PostgreSQL sources, this setting uses [CTID-based scanning](https://www.artie.com/blogs/postgres-ctid-scanning) to parallelize backfills by physical row location. This is particularly effective for large, append-only tables where rows are rarely updated or deleted.
CTID backfills can be slow to initialize for very large tables and may time out in environments with aggressive `statement_timeout` settings. For massive, actively updated tables, consider using Artie's parallel segmented backfill (based on integer primary keys) instead - contact the Artie team for details.
#### Enable soft partitioning
Splits your data into time-based partition tables while maintaining a unified view. Ideal for high-volume, time-series data where native database partitioning may not be optimal.
Artie automatically creates monthly or daily partition tables (e.g., `table_2025_08` or `table_2025_08_22`) and routes data based on a timestamp column. A unified view stitches all partitions together.
For more details, see our [Soft Partitioning guide](/guides/artie/soft-partitioning).
### Optimizations
#### Enable multi-step merge
For tables with very high write throughput on OLAP destinations (Snowflake, BigQuery, Databricks, Redshift), multi-step merge breaks the merge operation into smaller sequential steps rather than a single large statement. This enables Artie to handle extremely large flush batches (1 GB+) without hitting destination timeouts or resource limits.
See [Multi-step merge](https://www.artie.com/blogs/multi-step-merge) for a deeper look at how this works. For guidance on configuring flush rules alongside this setting, see [Tuning flush rules](/pipelines/flush-rules/tuning).
#### Use a merge predicate
Artie merges data into your destination based on your source table's primary key(s). If your destination table has an additional clustering or partitioning key, you can specify that column here so Artie includes it in merge predicates. This allows the destination to prune data during merges, reducing latency and cost.
If your Snowflake table has a cluster key, specify the clustered column. For example, if the table was clustered by `created_at`:
```sql theme={null}
ALTER TABLE foo CLUSTER BY (TO_DATE(created_at))
```
If your BigQuery table is partitioned, specify the partition column (e.g. `created_at`) so Artie can prune partitions during merges.
See [Enable BigQuery partitioning](/guides/database/bigquery/enable-bigquery-partitioning) for a step-by-step guide on setting up partitioned tables.
#### Parallelize backfill using CTID
For PostgreSQL sources, this setting uses [CTID-based scanning](https://www.artie.com/blogs/postgres-ctid-scanning) to parallelize backfills by physical row location. This is particularly effective for large, append-only tables where rows are rarely updated or deleted.
CTID backfills can be slow to initialize for very large tables and may time out in environments with aggressive `statement_timeout` settings. For massive, actively updated tables, consider using Artie's parallel segmented backfill (based on integer primary keys) instead - contact the Artie team for details.
#### Enable soft partitioning
Splits your data into time-based partition tables while maintaining a unified view. Ideal for high-volume, time-series data where native database partitioning may not be optimal.
Artie automatically creates monthly or daily partition tables (e.g., `table_2025_08` or `table_2025_08_22`) and routes data based on a timestamp column. A unified view stitches all partitions together.
For more details, see our [Soft Partitioning guide](/guides/artie/soft-partitioning).
