> ## Documentation Index
> Fetch the complete documentation index at: https://artie.com/docs/llms.txt
> Use this file to discover all available pages before exploring further.
# Okta SSO
> Configure single sign-on (SSO) for Artie using an Okta OIDC web application.
You need to be your company's Okta admin **and** an Artie admin to complete this setup.
**What you'll need before starting:**
* Access to your Okta admin dashboard
* Admin access to your Artie account (Settings → Authentication)
## Set up Okta
1. Log in to your Okta admin dashboard
2. Go to **Applications → Applications**
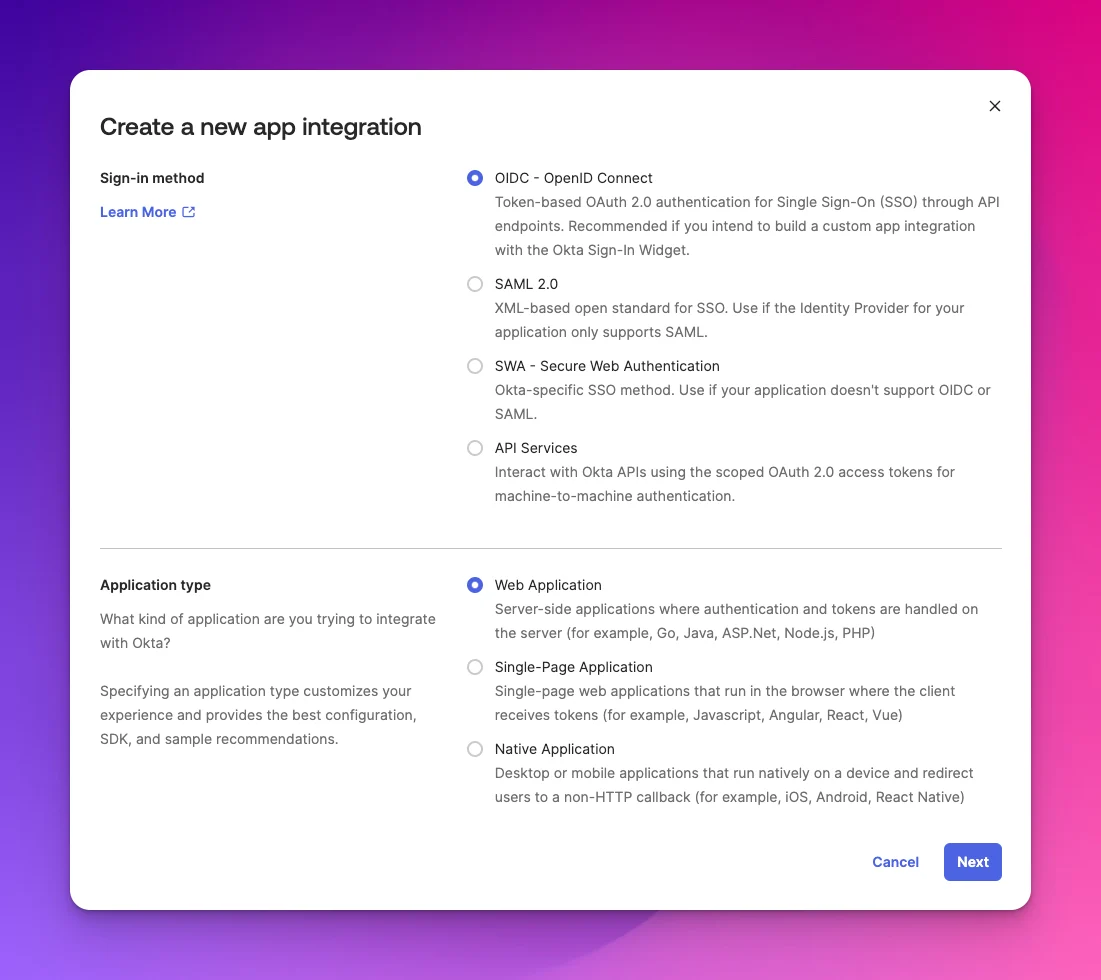
3. Click **Create App Integration**
4. Select **OIDC - OpenID Connect** and choose **Web Application**
5. Click **Next**
 * **Application name:** Artie
* **Grant type:** Authorization Code only
* **Sign-in redirect URI:** `https://api.artie.com/sso/okta/callback`
* **Sign-out redirect URI:** `https://api.artie.com/logout`
* **Initiate login URI** *(optional, enables Artie as an Okta tile app):* `https://api.artie.com/sso/okta/login`
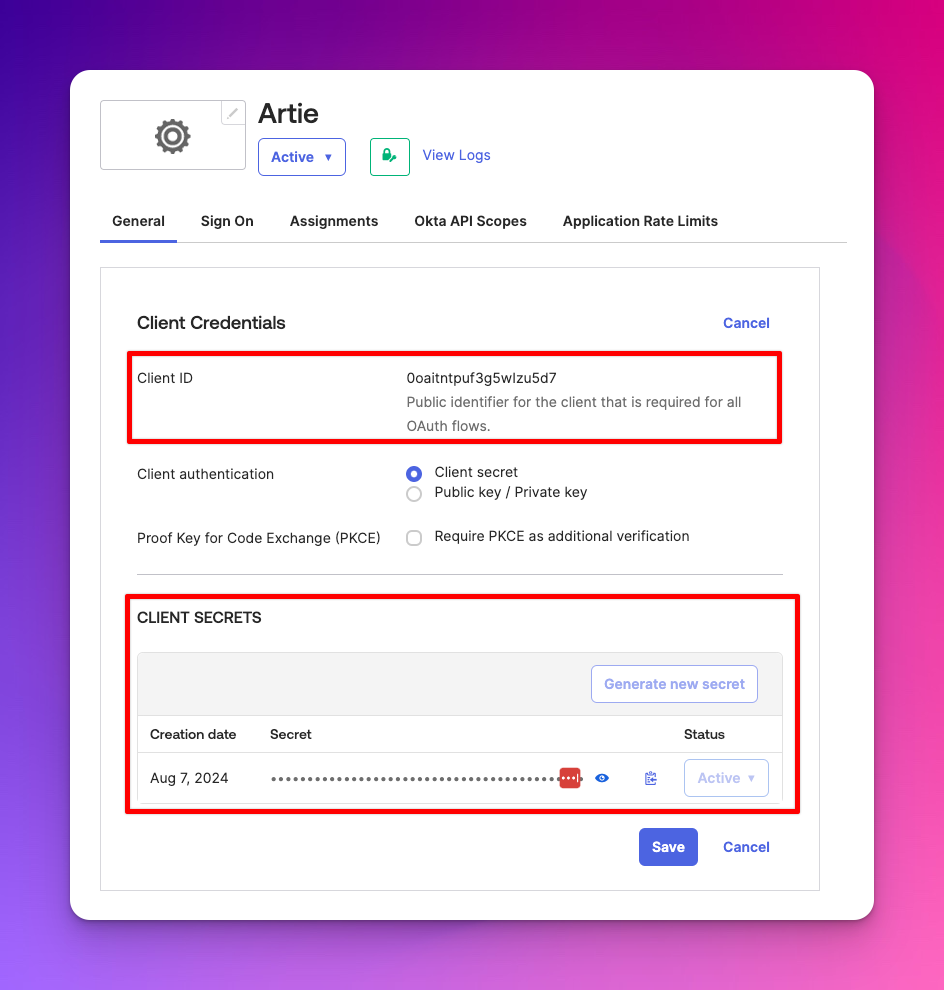
From the application's **General** tab, copy:
* **Client ID**
* **Client secret**
* **Application name:** Artie
* **Grant type:** Authorization Code only
* **Sign-in redirect URI:** `https://api.artie.com/sso/okta/callback`
* **Sign-out redirect URI:** `https://api.artie.com/logout`
* **Initiate login URI** *(optional, enables Artie as an Okta tile app):* `https://api.artie.com/sso/okta/login`
From the application's **General** tab, copy:
* **Client ID**
* **Client secret**
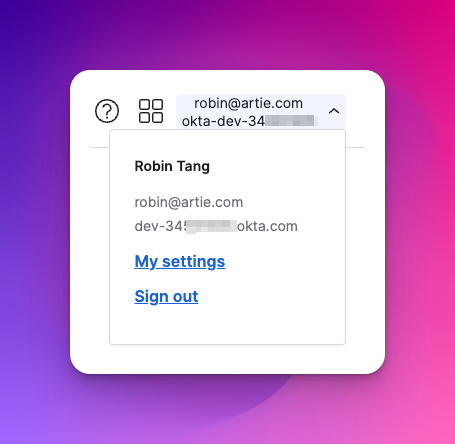
 Your **Okta domain** (the issuer URL) is shown in the top-right navigation bar of your Okta admin console. It looks like `https://yourcompany.okta.com`.
 ## Configure SSO in Artie
1. Go to [Settings → Authentication](https://app.artie.com/settings?tab=authentication) in Artie
2. Click **Configure Okta SSO**
3. Enter your **Okta domain**, **Client ID**, and **Client secret**
4. Click **Save**
Users can now log in at [app.artie.com/login/sso](https://app.artie.com/login/sso).
## Provisioning users (SCIM)
Artie supports automatic user provisioning and deprovisioning from Okta via SCIM (beta).
The SCIM app is separate from the SSO app. The SCIM integration handles provisioning only and does not support login.
In Artie, go to [Settings → Authentication](https://app.artie.com/settings?tab=authentication) and create a new API key with the **SCIM** type. Copy and securely store the key. You will need it in Okta.
Add the [OAuth Bearer Token Governance with SCIM 2.0](https://www.okta.com/integrations/oauth-bearer-token-governance-with-scim-2-0/) integration to your Okta tenant.
On the **General Settings** page:
* Set the **Application label** (e.g. `Artie SCIM`)
* Under **Application visibility**, uncheck **Display application icon to users**. This app does not support login and should not be visible to end users.
Open the newly created app and go to the **Provisioning** tab:
1. Click **Configure API Integration**
2. Check **Enable API integration**
3. Set **Base URL:** `https://api.artie.com/scim/v2`
4. Set **OAuth Bearer Token:** paste the SCIM API key from Step 1
5. Leave **Import Groups** unchecked
6. Click **Test Integration**, then **Save**
Then under **Provisioning → To App**, click **Edit** and enable:
* **Create Users**
* **Deactivate Users**
Click **Save**.
Go to the **Assignments** tab, click **Assign**, and assign the users or groups who should have Artie access. Assigned users are automatically provisioned to Artie with standard permissions.
## Configure SSO in Artie
1. Go to [Settings → Authentication](https://app.artie.com/settings?tab=authentication) in Artie
2. Click **Configure Okta SSO**
3. Enter your **Okta domain**, **Client ID**, and **Client secret**
4. Click **Save**
Users can now log in at [app.artie.com/login/sso](https://app.artie.com/login/sso).
## Provisioning users (SCIM)
Artie supports automatic user provisioning and deprovisioning from Okta via SCIM (beta).
The SCIM app is separate from the SSO app. The SCIM integration handles provisioning only and does not support login.
In Artie, go to [Settings → Authentication](https://app.artie.com/settings?tab=authentication) and create a new API key with the **SCIM** type. Copy and securely store the key. You will need it in Okta.
Add the [OAuth Bearer Token Governance with SCIM 2.0](https://www.okta.com/integrations/oauth-bearer-token-governance-with-scim-2-0/) integration to your Okta tenant.
On the **General Settings** page:
* Set the **Application label** (e.g. `Artie SCIM`)
* Under **Application visibility**, uncheck **Display application icon to users**. This app does not support login and should not be visible to end users.
Open the newly created app and go to the **Provisioning** tab:
1. Click **Configure API Integration**
2. Check **Enable API integration**
3. Set **Base URL:** `https://api.artie.com/scim/v2`
4. Set **OAuth Bearer Token:** paste the SCIM API key from Step 1
5. Leave **Import Groups** unchecked
6. Click **Test Integration**, then **Save**
Then under **Provisioning → To App**, click **Edit** and enable:
* **Create Users**
* **Deactivate Users**
Click **Save**.
Go to the **Assignments** tab, click **Assign**, and assign the users or groups who should have Artie access. Assigned users are automatically provisioned to Artie with standard permissions.